
Facebook likes to make simplicity complicated – so we’ve taken the time to break down everything you need to know about Facebook Business Manager into one handy blog post!
In this post you’ll learn:
- What is Facebook Business Manager?
- How to set up a Facebook Business Manager
- How to customize your Business Manager
- Add/claim your page
- Add/connect your Instagram account
- Adding Users & Partners
- Securing your Business Manager
We’ve got a lot to cover, so let’s get started!
The Lowdown on Facebook Business Manager
According to Facebook, Business Manager helps advertisers “integrate Facebook marketing efforts across their business and with external partners.” Essentially, it’s the one stop shop so you don’t have to mix your personal Facebook content with your business content.
Setting up a Facebook Business Manager is free and allows you to run and track your ads, manage your assets (like pages and ad accounts you have access to), as well as add an agency or other marketing partner to help manage your business.
Who should get a Business Manager?
Everyone. If you manage a business Facebook page, you should set up a Facebook Business Manager. Even if you aren’t using multiple assets like ad accounts now, you may in the future, and it’ll help save you a lot of hassle in the future to have everything centralized to begin with.
Specifically, Facebook business managers are great for businesses with
- Marketing teams, with multiple people who work on marketing or manage your Facebook and Instagram accounts, and/or
- External vendors, like an outside marketing agency who helps create, run or manage your Facebook ads. This allows you to still maintain ownership of your assets and give access to a third party safely.
In addition to streamlining access to your assets, Business Manager also makes sure you have complete control and ownership over your Facebook assets, including all pages, ad accounts, and apps you own. This gives you the flexibility to still have control, even if the original page creator leaves your organization.
How is a Facebook Business Manager different from my Facebook Page?
Admins on Business Facebook Pages have complete control over the page, including posting, editing page information, adding events, photos, etc. As an admin, you also have access to more advanced features like Ad Center, Messaging Inbox, Insights and Publishing Tools.
Adding your page to a Business Manager provides you the same features, and more. But, most importantly, when you add your page to your Business Manager you are claiming that page as a legitimate business. This offers special protections to your business information and your overall identity on Facebook.
In a sense, you’re telling Facebook this page is mine, and it belongs to my business.
When you create a Business Manager, you also get access to Ads Manager, which is a more robust version of the basic Ad Center. If you are serious about running sophisticated, targeted ads or are working with a contractor or agency to do so, Ads Manager is a much more superior option for advertising.
What's the difference between Business Manager and Business Suite?
Facebook has been rolling out all sorts of new features for Business pages in the last few years. Notably, the Business Suite.
According to Facebook, Business Suite enables users to
- Save time by posting to Facebook and Instagram at the same time, and manage posts in one place.
- Stay up to date by getting notifications and alerts for both Facebook and Instagram in one place.
- Analyze business results and see what’s working for both Facebook and Instagram with combined insights.
Business manager, on the other hand, differs from Business Suite (and also Creator Studio) because it is not focused on content creation and communication. Instead, Business Manager is designed to “manage” your assets and make sure your business is set up, ready to advertise on all of the Facebook Family of events.
Eventually, Business Suite will probably replace Business Manager. But, right now, not all the tools are available in Business Suite that are in Business Manager – so be aware a change is probably coming soon. Try not to get too comfortable with Business Suite as it is.
You may have also noticed the new Business Suite mobile app. Everyone has access to the mobile app, but not everyone has the desktop version of the new Business Suite (which replaced Pages Manager). This is likely to cause some confusion, so feel free to reach out if you have any questions.
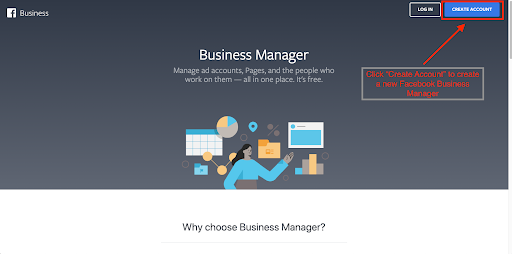
How to set up a Facebook Business Manager
Setting up a brand new Facebook Business Manager
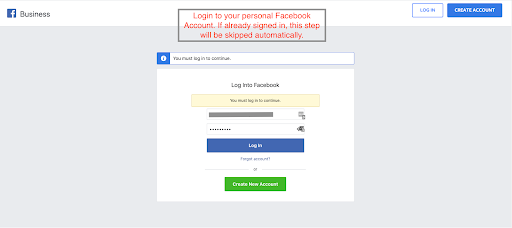
Note – Everything you do for your business on Facebook must be done through your own personal Facebook account. You can’t set up a Facebook page without having a personal account of your own.
Go to https://business.facebook.com/ and follow the instructions.
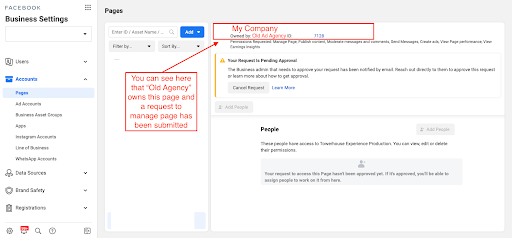
What to do when another Business Manager owns your page
If someone else set up your Business Manager while they created your Facebook page (or claimed it without adding you), you’ll need to find out who owns the page to request a transfer.
Note – you need to be an admin to request a transfer.
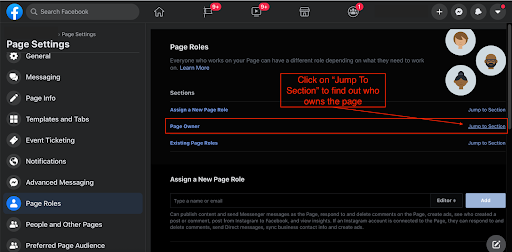
1. Go to your page’s admin dashboard and click the Settings tab
2. Click Page Roles on the left menu
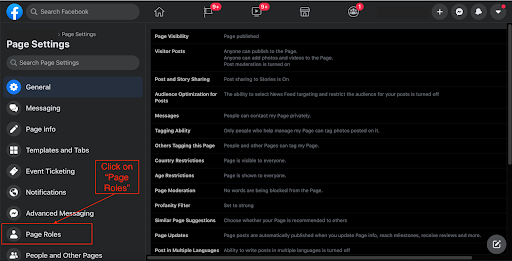
3. Click on page owner “jump to section” to find out who owns the page. You can also see who owns your page by going to Business Settings → Pages
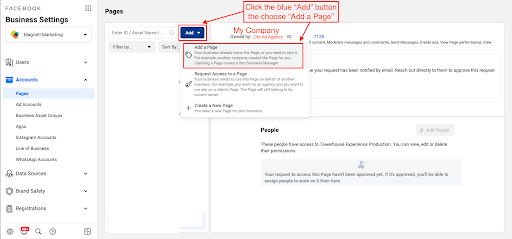
4. To request ownership of your page, click the blue “Add” button, then “Add a Page.” Then, input your page URL or the name of the page and click Add Page.
We suggest contacting the previous owner of the page directly so they know to look out for a Facebook notification to approve the transfer. You can send them these instructions from Facebook on how to approve it, so it can be done quickly.
One the previous owner has confirmed the change in page ownership, you now own your page in your Business Manager.
Customizing your Business Manager
Once you’ve set up your Business Manager, it’s time to start adding your assets and additional information to your account.
Add/Claim Your Facebook Business Manager
One of the first things you need to do once you create your Business Manager is to add your Business Page.
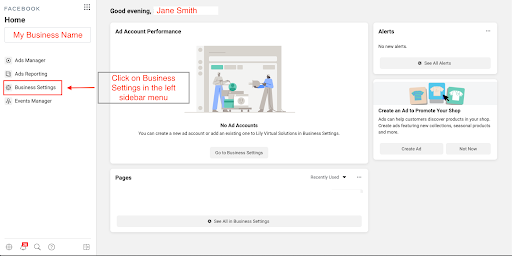
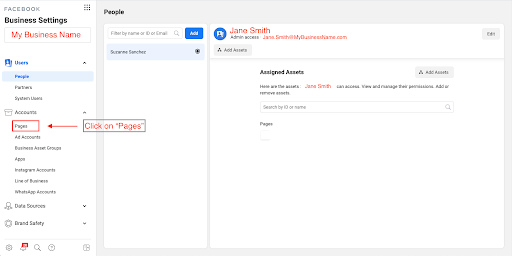
1. On the Business Manager Dashboard/homepage, click “Business Settings.”
2. Click “Pages on the left sidebar menu.
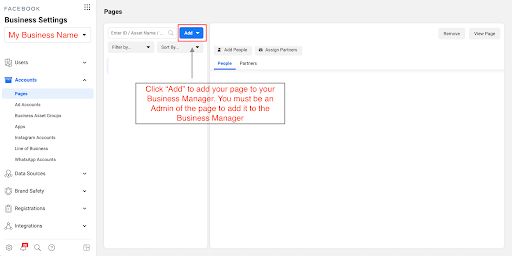
3. Click the blue “Add” button. You must be an administrator of the page to add it to your Business Manager.
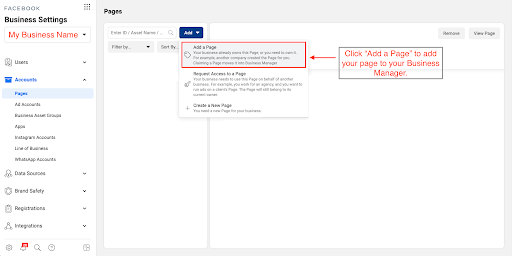
4. Click “Add a Page” to add the page to your Business Manager and claim the page ownership.
5. Type the name of your Business Facebook Page, or copy and paste the URL of the page in the field. Then, click the blue “Add Page” button. Your Facebook Page should pull up when you type in the name or add the URL. Then, the blue “Add Page” button gets darker and you can click it.
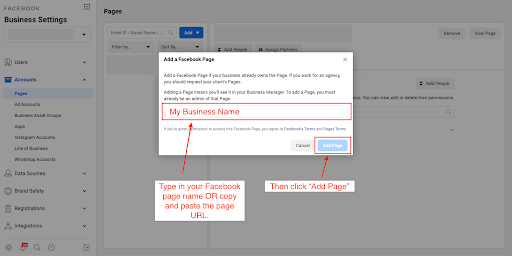
Since you are an administrator for the page, the request will go through automatically and be approved. You now own your page in Business Manager! No other business can claim it now.
Add/Connect Your Instagram Account
Facebook and Instagram are basically one in the same now (in case you didn’t know, Facebook owns Instagram). While you can do a lot in the Instagram app itself, connecting your Instagram account to Business Manager allows you the ability to run ads on Instagram, as well as integrate your Direct Messages all in one spot.
1. Go to Business Settings → Accounts → Instagram Accounts. Click the blue “Add” button to add your Instagram account.
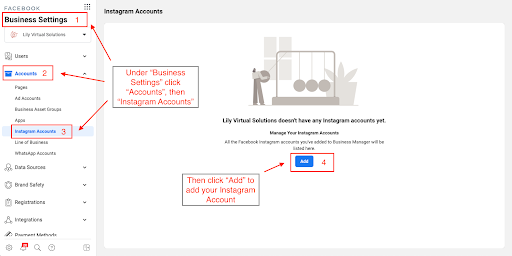
2. You’ll be prompted to log into your Instagram account, so have your username and password handy.
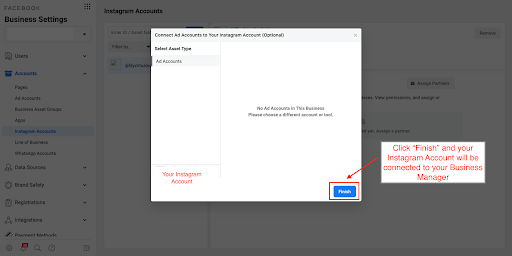
3. Once you log in, Facebook will connect, then redirect you to a new screen. Click “Finish” and you’re all set!
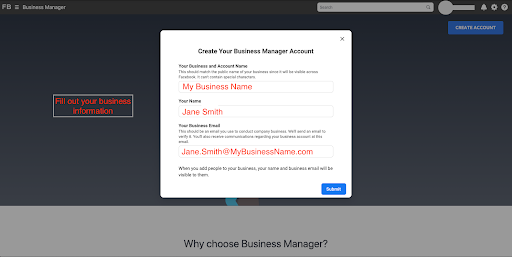
Complete your Business Information
To complete your business information, Click “Business Info” on the left sidebar menu. It’s important to add as much information as you can, as this section proves to Facebook you are a legitimate business.
You can find your Business Manager ID in the business information section as well.
Add Users & Partners to Your Business Manager
In order to give other people, like employees, managers, or agency partners, access to your Facebook assets, you’ll need to add them as users or partners to your Business Manager.
Typically, people who are added as users to your Business Manager will be working directly with your Facebook campaigns (rather than only need access to just your Facebook page).
If you are working with a marketing agency or a contractor, we suggest adding them as Partners, not users. This provides another level of security, so you aren’t giving people outside your organization more information than they need.
There are two levels of user access
- Employee access: User only has access to the assets you choose.
- Admin access: User gets access to everything, including updating and changing the permissions of others.
To add a Users
- Go to Business Settings and click Users on the left side menu.
- Click “Add”
- Add the person’s email (this MUST be the personal email they use for their personal Facebook account).
- Choose the permission level and Send. The user will get a notification email and must accept it to access your business manager.
To add a Partner
- Go to Business Settings and click Partners, below Users
- Click “Add”
- Select “Give a partner access to your assets.”
- Enter the Partner Business ID and click Next
- Select the assets you want to share with the partner and click Save Changes.
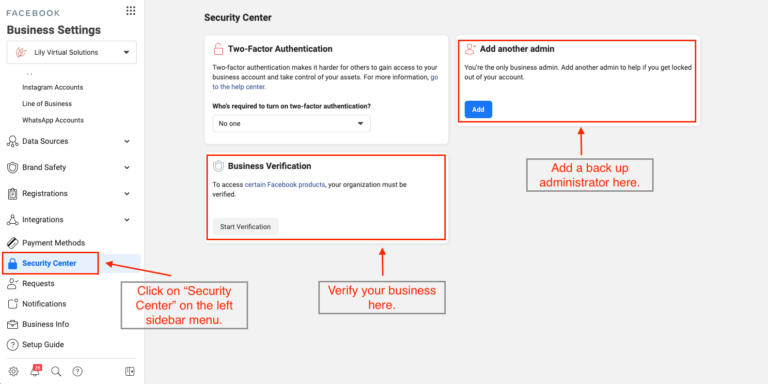
Secure Your Business Manager
To add another layer of security to your Business Manager account, you can complete the Business Verification Process. This also gives you the ability to add a backup administrator in case the primary administrator is locked out.
To secure your Business Manager go to Business Settings → Security Center. Follow the prompts to verify your domain. In order to verify, you’ll need one of the following:
- Business license
- Certificate of Formation or Incorporation
- Tax or VAT registration certificate.
You’ll also need to provide one of the following to prove your business address.
- Utility Bill
- Bank Statement
- Business license with address or phone
You can then choose to verify your business by either getting a phone call, an email, or with your business domain.
Wrap Up
Hooray! Your Facebook Business Manager is set up and now your ready to take the next step – setting up and managing your Facebook Ads account!
We’ll cover that in our next post, but for now, sit back and relax – you’ve made Zuckerberg proud.